Where to begin
Today was the first day in ages I haven’t had a whole lot of tasks to do by a looming deadline so I did some Xmas shopping in the morning and had a nice relaxed start. I am avoiding starting the accordion book wedding piece as it has so many possible directions but have started laying our a simple plan.
So my other…next big project is working on my entry for the She exhibition held every year at Walker St Gallery in Dandenong for international women’s day.
My choice is the long tall format that I began months ago (my Athena piece) or a larger square canvas (36 x 36 inches or 91.4 x 91.4 centimetres).
I needed to play so have layer down the base on my large square canvas. I have decided to share the steps of my process as I add new materials and continue to explore the possibilities of so many mediums and approaches. I will go through the steps at each stage and upload the work in progress. No idea where it will go from the layered beginning.
Stepping out the process:
Step 1:
Using a dark blue watercolour pencil I created a very rough 5 x 5 grid…no rulers and plenty of wiggly lines.
Step 2:
I choose the basic 2 colours that I want to play with on the base of the composition. I am conscious of the imagery as what is in the bottom layer may be barely seen at the end but has a subconscious influence and will be part of what guides the direction of the piece. I use a couple of basic blue designs ( one floral and one with a repeated butterfly image). I contrast this with brown paper wrapping that has been hand printed with white flower-like snowflakes. I place each different design onto the grid one pattern at a time. I am looking for a random sense of balance. I use the Mont Marta impasto medium as my favourite adhesive as the thickness gives me more control with a variety of different types of paper.
Step 3: I often use stencils (either bought or home made) but this time is the first time I have used acrylic spray paint. I spray black acrylic through a butterfly design in several areas, turning the canvas. I do the same with a chrysanthemum stencil. I am starting with black spray paint as I like the silhouette effect. The stencils were chosen to link with the imagery already established by the collage papers.
Step 4: I add sections of brown pattern tissue paper to create transparencies and add some random lines that are printed on the paper. The pieces are roughly torn and the grid is a general placement guide which will disappear in later layers.
step 5: Now it is time to break down any hard lines that still exist from the grid. I use gesso to roughly paint in the areas between the design elements. As I am aiming for a balanced composition, much of the stencil work is painted over but the glimpses of imagery help to unify the composition.
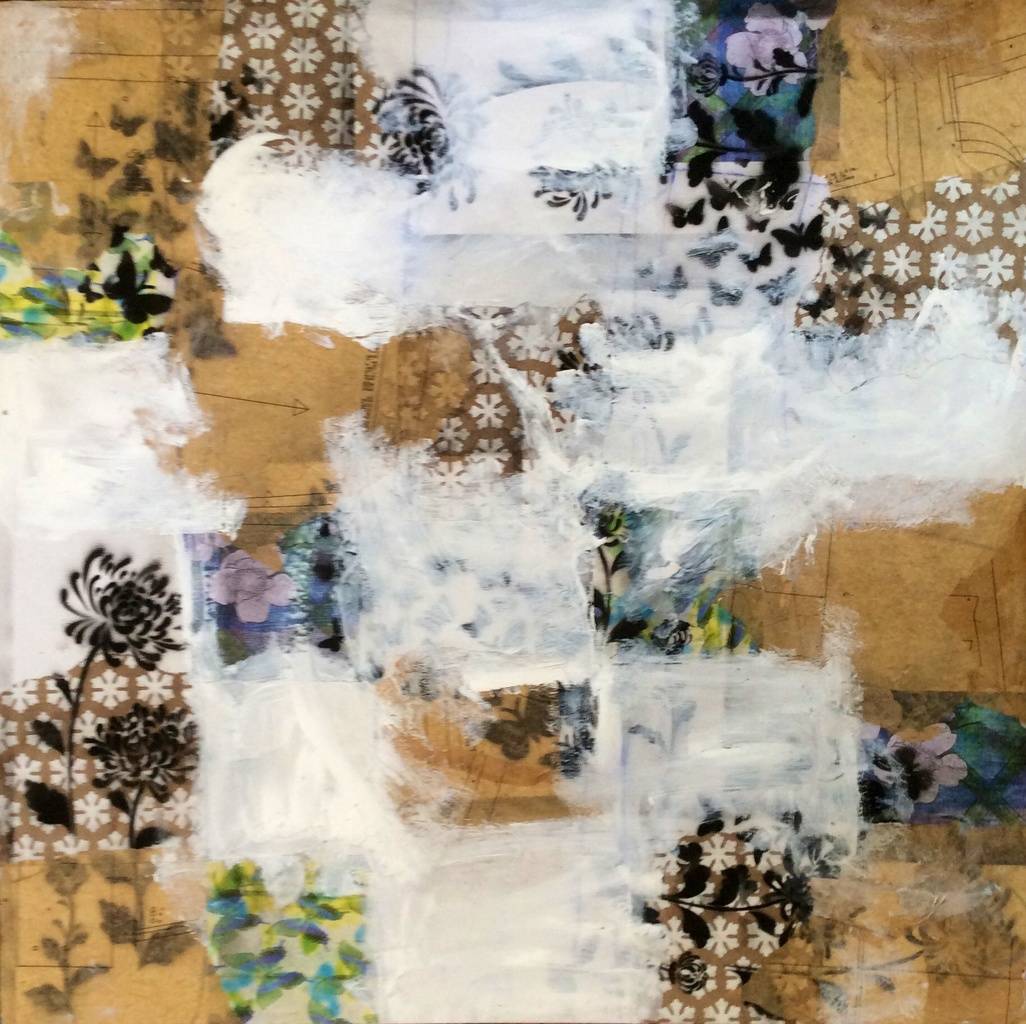
The first few layers…developing a base.